Sunday 29 January 2017

Paint Table Saturday

Paint table Saturday was a great success, having made a substantial assault up the lead mountain with the assembly of two tanks and painting of twenty six 28mm figures. Lots of basing work left to do sadly.

Saturdays haul included the assembly of Warlords plastic Churchill tank in MkIV configuration, HLBSC's resin Vickers Medium MkII. These were both latterly base coated in Vallejo black surface primer. I will say that Richard Kemp of HLBSC customer service is second to non, he spotted a miscast of the hull after he posted the kit and followed up by sending a new hull within 24hrs. The Vickers may reappear in a project to model the 1920s British Army experimental mechanised force.

HLSBC Vickers Medium on the left and Warlord Churchill MkIV

Finally finished the S&S models 28mm scale 105 Light gun and crew converted for BAOR with some Mofo miniatures head swaps for the crew. After a few tries I rediscovered the knack for painting DPM. Just needs a dry brush and grass for the base.

S&S Models 105 Light Gun in the direct fire role. The crew are a little gawky, however when placed next to the piece they look fine. The heads are by Mofo Miniatures from their Falklands War line.

Next up was Eureka miniatures 28mm 1980s Soviet tank crew in NBC respirators (love the womble look).These are based off the 1988 Film called 'the Beast', which is well worth the watch. A younger me used to show the opening scene in Law of Armed conflict lectures as how not to do business!


Warsaw Pact Wombling free...

Lastly was painting the last of the Wargames Foundry 28mm WW2 British Commandos for Bolt Action raid scenarios and 'Hour of Glory'. Easy to paint and brilliant Perry sculpts. Just need to man up and base them!

Saturday 28 January 2017

Warlord 1/56 Churchill Mk IV Kit

The Warlord Games / Italeri Churchill tank kit was on offer as part of the "Tanksgiving" deal. Not one to miss a bargain I snapped it up alongside a universal Carrier and a resin 'burlap' camouflage Cromwell since built. 

Excellent box art showing Churchills in action.

The kit is a fairly standard offering from Italeri, however it does have one bonus in that the sheer number of variants you can create is huge! For the build I opted for the cast turret MkIV.
Some of the options that can be found on the back of the box.

The kit is easy to assemble, the tracks are somewhat fiddly, but mistakes can be rectified with fitting the track guards and hull top. The instructions are easy to follow and give the indications of the variants. In all, the kit took little under thirty minutes to clean up and assemble without the need to deploy Anglo Saxon swear words. I would happily buy another to supplement my ever growing late war 28mm British Army.

Completed tank alongside a Foundry 28mm Commandp

Completed MKIV ready for painting

Looking at the layout of the sprue and fit of the kit, it looks if it can be readily converted to other variants with and additional sprue (a potential release of the future?) such as a crocodile. Earlier marks could be converted by removal of the top track guard and shaving the square side doors off and replacing with round, although I may avoid this torture and buy one of MadBobs offerings for MkI and II's. 

Hull and turret sprue showing the sheer volume of options for main armament and MKs.

Track sprue, as ever free standing tracks are ghastly to assemble. 

Hull side sprue.

Thursday 26 January 2017

Cribs

Having moved house recently,  an opportunity to have a dedicated painting/wargaming room came about much to the disgust of Mrs Russet.

This week the first item of furniture arrived to make it a reality. A good buy from Ebay; an oak roll top computer desk has sufficient storage for fifty percent of the lead mountain, tools and modelling kit as well as a spacious desk space. The advantage of being a modern roll top desk is that there is sufficient room for the MDT paint racks and ports to run power for the lighting.

Some future work is needed to turn it into a 'Five S' Lean compliant work space. Next up will be the acquisition of suitable storage for the unpainted lead mountain and larger modelling materials, I feel a crafty IKEA hack coming on. 
The oak roll top work desk. 

Tuesday 24 January 2017

Polystyrene Ruins 2

A little update on the ruins. The model was base coated black and progressively dry brushed up from Vallejo German Grey up a to a very light grey.

Metalwork was picked out in GW Dark Flesh and rust streaks added using Miniature Paints Chestnut brown ink. Windows were dry brushed in black to replicate the ravages of fire. The model will now be completed with weathering powders and some small clumps of grass. 
.


Ivan surveying the ruins (Blacktree Designs).

Sunday 15 January 2017

Polystyrene Ruins

Many years ago, well actually twenty one years ago, Games Workshop released an inspirational book called  How to Make Wargames Terrain. This book shows hows to build terrain from waste packing and a few modelling supplies with stunning results.

A very well thumbed copy, that the 16 year old callow youth that was Russet Coat Captain bought from GW Milton Keynes in 1996.

Today whilst unpacking the collection after the recent house move, stumbled upon several polystyrene packing trays that used to come with GW miniatures. Armed with my well thumbed book, I set about fashioning a shelled out ruin as found on page 69 of the tome. 

Polystyrene packing tray by GW. Should I list this as OOP, Rare, and Limited Edition on ebay?

The crux of the job was re orientating the packing tray to turn it into a ruin. After a frantic session of hacking with a scalpel without lopping off my fingers (a rarity), the tray started to look like a ruin with  windows, doors and bullet holes. The assembly was then glued to a mount board base. On reflection some hard board or plastic card would of been a better base to avoid warping.


Off cuts of tray were then glued on to form rubble heaps. The building was then rendered with a thin layer of polyfilla to infill the polystyrene patina and to give it a concrete texture. Sections of wire were poked into the walls to give the impression of reinforce concrete as well as some off cuts of plastic girder and pipe. 


Lastly the ruin had basing material glued onto it and set in place with Woodland Scenic Cement. This will now be undercoated and painted at a latter date. With some perseverance the packing tray morphed into a convincing looking building after my nostalgic walk through 1996 and GW's superb How to Make Wargames Terrain book. It will be used for 40K, 1980s BAOR and possibly Bolt Action given a sympathetic paint job. 

After the recent move, the painting desk has become an adhoc affair, hopefully when time and the Memsahib permits, I will be able to install a suitable desk. 

Saturday 7 January 2017

Moving house

There is nothing on this planet that fills a wargamers heart with dread more than thinking of moving their collection to a new home. Well other than leadrot or the thought of self imploding glass display cases! I may need to sit down...

Today I managed to move the painted lead mountain from East London through the Blackwall Tunnel, a ghastly dank hole with an over abundance of manhole covers designed to vibrate miniatures in their cases, through the delights of Blackheath and it's artizan bakeries and then finally to the new home in the promised land of Hither Green and it's many speed bumps.

All present and correct Sir!

Thankfully the collection remained intact without a single breakage. Now to crack open the champagne and an Epicure No2 and consider the new hobby room.

I love it when a plan comes together.

Thursday 5 January 2017

JFTM 1/56 A34 Comet Tank


JFTM under the 'Die Waffenkammer' line produce some of most magnificent resin kits, the A34 Comet tank kit did not disappoint. The model was exceptionally cleanly cast with very intricate detailing. I recommend that the parts are cleaned to remove the mould release agent prior to assembly and that a hard wearing undercoat primer is used as the resin used can easily chip.

The tank was assembled with ease and once I overcame the release agent issue painted well. It was painted in the standard scheme I use for late war British, using Vallejo 'Soviet Uniform' as the base coat inked with with Army Painter 'Strong Tone' wash. The model was finished off with light dry brushing, Tamiya mud for the tracks and hull and a light application of weathering powders.


JFTM 1/56 A34 Comet Tank

The A34 Comet tank was the final word in British Cruiser tank design. There had been attempts at marrying the 17pdr anti tank gun with the Cromwell body in the past, namely the A32 Challenger which proved unsatisfactory due to the high turret profile.

The Comet tank is based on the very heavily modified Cromwell hull with the addition of additional road wheels and return rollers which was a departure on the Christie  wheel arrangement. The tank was armed with a new weapon, the 77mm HV gun which was purpose designed for fitting into the tight confines of a tank turret. The gun fired the 17 pdr projectile with a much shorter cartridge case. It had an additional coaxial Besa machine gun to the main armament and further machine gun in the bow.

The Comet entered service in mid 1945, missing the majority of the NW Europe campaign. It did however take part in the Rhine Crossing hence its addition to my 28mm collection. As late as the 1980s three Comet tanks would serve with the Irish Defence Force. The tank became fast obsolete with the arrival of the British Army's first Main Battle Tank, the A41 Centurion tank in the late 1940s.


Wednesday 4 January 2017

2017 Targets


"To have a plan; if it is not the best plan, it is at least better than no plan at all"

Maj Gen J Monash 1918


Part of the purpose of this blog is to add some structure to my collecting and painting aspirations for the year. This has been somewhat problematic in past years as the lead and plastic objects d'art collecting on the paint table seem to appear and multiply like a snowball rolling down hill.

Shooting in the Army has taught me that targets are seldom hit in the right spot.


My primary areas of focus for 2017 are:


Man Cave. Establish a hobby room in the new house and resolve storage issues.

Clubs. Dip my toes into the world of wargames clubs in South East London following my move of location. I have not been a club member in over a decade and have rather missed the camaraderie.

Napoleonic Waterloo Prussians. This is a project to build a Prussian Brigade of mainly Perry plastics with some Foundry metals. A last minute purchase courtesy of Warlord and their New Year 50% reduction on plastic sprues means the addition of a plastic Landwher Regiment!


Zulu Wars project. A mixture of Warlord plastics and metal Black Tree Designs British and Zulu figures. Intended for use with Blackpowder.


Ongoing works of established collections.


Great War BEF. Basing of troops.


WW2 Late War British Army for Bolt Action. Weathering of vehicles, addition of crew & commanders. Basing of infantry. Completion of 'dug in' infantry in foxholes and slit trenches. Build of Warlord Plastics Churchill Tank and Universal Carriers.


AWI. Basing of several regiments. Painting of Perry Miniatures, Lee's legion & Euraka Miniatures Molly Pitcher with Cannon and a Regiment of Marbleheaders. A side project to model British heavy Dragoon units that did not deploy to the Americas during the war. Build of Continental Perry Plastics and Wargames Factory plastic Hessians regiments.


Cold War BAOR.  Weathering of AFVs, completion of a 105 Light Gun with crew and painting of a Shorland Armoured Car. Conversion of a Sloppy Jalopy FV432 to take a Minifigs Wombat.


Tuesday 3 January 2017

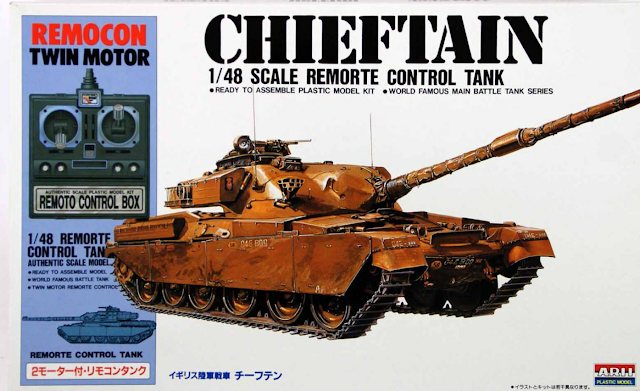
1/48 Arii Chieftain Tank

Having been frustrated for a number of years in completing a small 28mm BAOR Cold War force for the lack of any available Chieftain Tank models, I was surprised to find these Arii 1/48 scale remote control tank kits on ebay for £8 a kit.


Familiar looking box art. 

The kit seems to be similar to Tamiya's Mk5 Chieftain MBT 1/35 superstructure tooled for 1/48. The moulding is surprisingly crisp and detailed although some components looked modified for the rigors of being a remote control vehicle. The hull, tracks and road wheels are generic for all Arii's kits and built for remote control motors. This makes the superstructure look high on the hull in order to fit the motors. Trimming 7mm from the back hull plate reduces this problem and seats the generic road wheels behind the side skirts bringing the tank back into proportion. The running gear is somewhat fiddly to assemble and attach the wheels to the spindles. The tracks are generic tank tracks made in a one part rubber loop. 

Completed kit with paint job with dry brush, awaiting decals and weathering. 

In conclusion this kit cheaply fills a hole in the current ranges offered for 1980s BAOR forces. It scales well next to comparable armour from HLBSC and at a pinch with Sloppy Jalopy's 1/56 cold war range. At £8 to £10 it offers value for money. I have another two kits to build up, these will be modelled with cam netting and stowage. It also brought about memories of clambering over the hulks of this once mighty MBT dug in on Longmoor Training area. 

New year, New blog.

New Year, New Blog!

I have dabbled with the idea of writing a blog for some time having followed some simply stunning works of the blogsmiths art showcasing the wargaming hobby for a good few years. With the introspection that comes with moving house by ploughing through belongings and memories and a change of year, the inertia has finally taken me to start tapping the keyboard and put my thoughts on my view of the hobby into a blog.

So what is Russet Coat Captains blog all about? The blog has a number of objectives:

1. Plan and track progress for projects.
2. Build contacts within the hobby for gaming.
3. Showcase modelling and painting of miniatures.
4. Air thoughts on historic engagements.